How To Take Stellar Doll Photos... Photography Tips People Gatekeep

Hey guys! I’m always trying to learn more about photography. I mean, you’ve seen it around the blog—I’m constantly trying to practice and improve my photography skills. I wouldn’t claim to be a professional, but I have learned a lot about the art. I think if you compare my photos from 2022 to now, there is a significant difference, and I credit that completely to technique. The easy thing about photography is that the concepts are simple to learn. Once you know what to look out for, it just takes training your eye (and maybe your biceps—that camera is heavier than you think!) to get great results. I’ve been wanting to make a post with my tips for photography for a very long time. In fact, I started outlining a post for photography tips in March 2023! Which… I shudder at the thought, but I had no clue how to use a camera back then. Luckily, I’m writing this in 2025. :) This is an attempt to create a master post on just about everything I know about photography… it’s quite long (17 pages on Google Docs, as a matter of fact), so sit down, grab a snack, and enjoy!
Camera Talk
I’m starting this post with the assumption that you’re shooting on a DSLR. If I’m already losing you, don’t worry! A digital single lens reflex (Aka a DSLR) camera is a type of camera that has sensors, manual settings, and changeable lenses. The camera you use does make a difference in your photos, but this isn’t meant to discourage you if you don’t have one. People take amazing photos without DSLRs all the time. DSLRs simply offer control of the next few things I’ll be talking about—but if you don’t have a DSLR, I’ll also be talking about composition later on, and you may or may not find those tips helpful!
Personally, I do not shoot on a DSLR. I have upgraded to a mirrorless camera, which does not use mirrors to bounce light into the camera sensor like a DSLR does. However, their functions are otherwise practically identical, so the things that I will be talking about here apply to both types of cameras.
Working With Your Camera
First thing’s first, if you’re using a camera, you’re going to want to shoot in manual mode. I never knew to shoot on manual until my summer photography camp, but once I did, my photography instantly changed for the better. Manual mode allows you to change the following settings, rather than having them preset.
Aperture
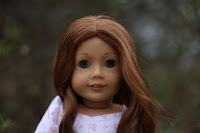
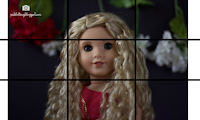
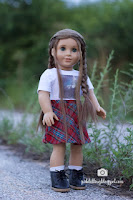
I see so many fellow American Girl photographers aspire to achieve bokeh in their photos. Bokeh is the little circles of light in the background of a photo like this one:
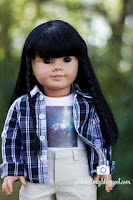
Min-Ji is in-focus while the background is blurry. This is due to the aperture I shot at. Aperture refers to the diameter of the opening in your camera lens, which lets light through. Depending on your settings, the hole can be opened wider or smaller when you take your picture. I remember when I was first learning about aperture, the concept seemed very daunting. I got so confused at the mention of fractions! Luckily, it’s actually pretty easy to understand, as long as you don't let numbers scare you.
Aperture deals with the depth of field. If the opening of your camera lens is larger, more light is able to pass through, but this also creates a shallower depth of field. In other words, less of the background is in focus. A shallow depth of field is how I achieved the bokeh in the photo above. If the opening is smaller, less light is able to pass through your camera and the depth of field isn’t as shallow. This will allow more of the background to be in focus.
An f-stop is a number that represents the diameter of the opening in your lens. Your camera should have settings that allow you to change this number. The f-stop is represented by a fraction—but don’t freak out here like I did! The numerator of this fraction is always “f”, which refers to the focal length of your lens. The denominator is the only thing you really need to pay attention to. A larger fraction means the hole is opened wider, therefore allowing more light to enter your camera and the depth of field in your photo to be more shallow. A smaller fraction allows less light in. So, in other words, f/2 will have a blurrier background (and more bokeh!) than f/8.
I took the photo above with an f-stop of f/1.8. The background (which is some nice green bushes) is nearly impossible to make out. If I had taken it with a smaller f-stop—say f/18—the bushes would be a lot clearer and you would likely be able to make out each leaf!
The depth of field a photographer shoots at depends on what their subject is. If a photographer wants all of the focus on a specific subject, then a shallower depth of field is key to directing a viewer’s focus to that subject. In this situation, your eye is going to be attracted to whatever is clear, which is why photos with more depth sometimes feel too busy. There are so many exceptions, of course, and I highly recommend experimenting with aperture in your photos! Photography is one of those things that you get better at with practice!
The lens you use also plays a huge part in what f-stops you can accomplish. After all, the lens is where the opening is. Lenses are typically designed with certain types of photography in mind, and some might not be able to open wide enough to support a higher f-stop number. I own three lower-cost DSLR lenses, and only one of them is able to go higher than f/4! Lenses can occasionally be more expensive than the camera body itself, so it’s definitely worth researching to figure out what lenses will give you the results you want. They can completely change the way your photos turn out, and it’s worth the investment!
Shutter Speed
But of course, aperture isn’t everything. In fact, aperture is only 1/3 of the main settings you’ll deal with on your camera. I never see AG photographers talk about the other two, and while they’re not as exciting, I wish I had learned how these things related sooner!
The next thing I’m going to talk about is shutter speed. More than likely, you’ve heard the term shutter speed. It’s the amount of time the shutter of your camera stays open. Sound easy? It is! The longer your shutter is set to stay open, the more light reaches your camera’s sensor, and vice versa. In this case, depth of field is unaffected. That’s all there really is to it!
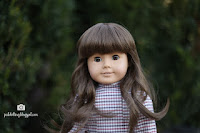
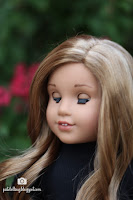
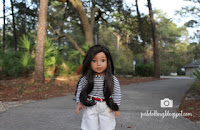
So, both shutter speed and aperture affect the amount of light that reaches your camera. Aperture affects both the depth and the brightness in your photo. Sometimes when you want to shoot on a specific f-stop, you might find that your photo is too bright or too dark. This is where shutter speed is necessary! Again, things will be represented by a number. This time, the fraction is how many seconds your shutter will be open when you go to take your photo. So, for example, I just turned on my camera and the shutter speed was set at 1/449.6 (which is so oddly specific… I think I messed with a setting and made my shutter speed only increase at weird intervals). If I were to take a picture, my shutter would be open for 1/449.6 of a second. My aperture was set at f/2.2. This was a photo I took on these settings:
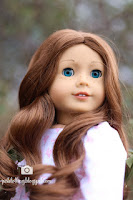
It was a beautiful overcast day, but since I was taking photos outside, it was pretty bright. Since my aperture was set at such a large number (look at that bokeh in the back!), I set the shutter speed to a higher number so that my photo wouldn’t be too bright, or overexposed. As I was trying to find the right settings for this photoshoot, I took this photo:
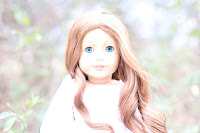
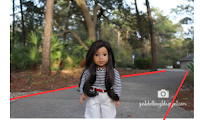
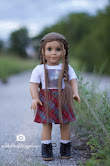
Notice how the field of depth is still shallow, but everything else is bright and washed-out. My shutter speed was set on a number larger than 1/449.6. My camera was letting in too much light, but I liked the aperture. So, instead of changing my aperture to let in less light, I changed my shutter speed to let in less light. However, after my first adjustment, my photo turned out like this:
It was more of a personal preference thing, but I wanted my photo brighter! Now my shutter wasn’t open for long enough. My shutter was open for too short of an amount of time.
1/449.6 was just what I decided the perfect middle ground was. Again, this is something that takes some experimentation!
(Most DSLRs won’t shoot bright photos at a speed of 1/450 seconds… keep in mind that my camera is mirrorless. Mirrorless cameras use a different type of sensor technology that allows for light to enter the camera quicker, and thus use shorter shutter speeds than DSLRs do!)
Shutter speed also correlates to motion. Since the shutter opening is what allows light to enter your camera sensor, a slower shutter speed can cause a motion blur if your camera or your subject moves.
This photo was taken in the evening, and since there was less light, I shot at a slower shutter speed. I believe it was set at 1/50 (on my old DSLR). However, my hands shook as I was taking the picture and if you look closely, you can see that it’s a little blurry! That’s why it’s helpful to use a tripod if you’re shooting at a slower shutter speed.
Despite this, motion blur isn’t always a bad thing. You can achieve some cool effects using motion blur!
A quick shutter speed is used to capture action shots. Since the shutter is only open for a small fraction of a second, motion blur is limited and you can, for example, freeze a basketball player mid-jump.
ISO
Sometimes you’ll adjust both your aperture and your shutter speed, only to find that your photo is still dark. Luckily, there is a third way to change how bright or dark your photos turn out. ISO is a setting that adjusts sensitivity of your camera’s sensor to light. This is, once again, represented by a number. A low number means the sensor will be less sensitive to light, while a higher number means the sensor will be more sensitive to light. Therefore, a lower ISO will result in a darker photo and a higher ISO will result in a brighter photo.
However, I once had a photography mentor who told us that ISO should only be raised as a last resort. How come?
ISO acts as an amplifier for the electrical signal in the camera sensor. So while the light that the camera picks up is amplified, electronic noise is also amplified. In other words, a high ISO can make your photo grainy. Ideally, you’d want to adjust your aperture and your shutter speed as best you can before raising your ISO. Doing so will minimize noise.
Normally, you won’t need to use a high ISO. In outdoor conditions, you probably won’t even need to use an ISO above 100 (the lowest setting) unless it’s dark. Indoors, you may need to raise it if the lighting isn’t adequate. Nighttime lighting or a completely dark room are when an ISO on the highest settings are beneficial.
By no means should you be afraid of the ISO setting. Yes, it can make your photo grainy, but a little bit of grain can be a fair trade-off for a dark photo. It’s worth experimenting with your camera’s settings to find the best results.
ISO is also something that different cameras handle differently. Older entry-level DSLRs are going to be noisier than a newer camera or a higher-level camera. My Canon Rebel T5 was pretty bad at handling ISO. My photos would get noticeably noisy at an ISO of 400 or 800… and the settings went all the way to 3200! To combat that, I mostly took photos outdoors in the daytime. The ISO capabilities of my T5 are part of why I wanted to upgrade. With my R6 Mark ii, I’ve shot up to 20000 (yes, twenty THOUSAND) ISO without any noticeable grain. (Again, it’s mirrorless and uses different technology.) So really, this is where the camera you use is going to impact your results. But like I said, for the most part, you won’t encounter the need to use a very high ISO.
The Exposure Triangle
Together, these three features create what’s called the “exposure triangle!” Exposure is simply the amount of light that’s let into your camera’s sensor, which is what we’ve been talking about this whole time!
Most cameras have a meter that will tell you how exposed your photo will turn out. On a DSLR, the viewfinder isn’t accurate to what your photo will look like, so the meter will tell you whether your photo will be overexposed, underexposed, or just right! The meter should have a little line that will move as you adjust your settings. You’ll want this line to fall right on the center of the meter, but you also might make a stylistic choice to shoot your photo exposed to the right (slightly overexposed, making it a little brighter) or to the left (slightly underexposed, making it a little darker). I like rich dark colors, so I typically take my photos a little exposed to the left. Experiment to find what you like!
The balance between aperture, shutter speed, and ISO to create the right exposure is usually represented with the exposure triangle diagram. It’s actually not a great representation of the relationship between aperture, shutter speed, and ISO; but it’s important to know that these three settings are interconnected—even if we’re not following the diagram. Just know that all three of these things come together to create your exposure!
Composition
As I once told my art teacher, “I’m a photographer; composition is in my blood.” Composition is vital to a good photo and yet, I think it’s the thing that takes the most practice to get the hang of. Honestly, a lot of times when I see doll photos taken by people who aren’t into photography, I cringe because of their use of composition. Composition is the way you arrange your photo so that a viewer’s eye is drawn to your subject.
The daunting thing about composition is that there are so many rules. I mean, really: grids, ratios, lines, space, symmetry… is your head spinning yet? I know mine is. The less daunting thing about composition is that rules were made to be broken.
Wait… E, you said that composition is key to taking a good photo, and now you’re saying not to follow composition rules?
What I really mean is, while there are certain “rules” to how things look best arranged in a photo, you should never let them limit your creativity. Breaking a few rules can make a photo more impactful when done intentionally. You shouldn’t ignore the rules completely, but it’s good to know why the rules work so that you can understand what will be effective when you deviate from them. Composition rules are less of “laws” and more like “guides.” Sometimes it’s hard to tell if your photos look good when you’re staring at them for so long, but if it looks visually appealing to you, it’s more than likely going to be visually appealing to your viewer. It’s about telling the story you want to tell. Even if you’re taking simple portraits of a doll, you’re still conveying an emotion to people who see your photo, and you’re the best judge of the vision you’re trying to capture.
So, we’re going to go over just a few composition “guides!”
Rule of Thirds (and how to break it)
The rule of thirds divides your frame into a grid with nine squares. The idea is that a subject placed where any of the grid lines cross is eye-catching. And it’s true! The rule of thirds does create a lot of interest! It draws your eye to the subject.
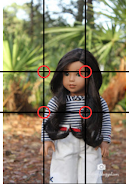
One photo I’ve taken that follows the rule of thirds is this one:

The first thing you notice is Julie. The next thing you notice is Joss. According to the rule of thirds, you noticed these spots first:
This is because, if we were to put a grid over the image, those circles are in the spots where the lines cross.

Notice how Julie and Joss both fall on the grid. This is what the rule of thirds is all about!
Here’s one where Nanea is framed according to the rule of thirds:
She’s lined up with the right vertical line, and her face is right at one of the intersection points!
Sometimes, however, I’ll take a photo like this:

Eden isn’t aligned with the points that cross on the grid. She’s actually stationed between them:
Breaking the rule of thirds this way can create a sense of balance and symmetry. This is why I said composition rules aren’t laws!
I personally always keep the grid in mind when I’m taking photos. A lot of cameras have a grid in their viewfinder, and if not, there’s likely a setting you can turn on to get a grid! I always look at how my subject is aligning with the 9-square grid and make decisions based on what I think best communicates the feelings I want to portray. I highly encourage you to mess around a little here! Take a photo using the rule of thirds, then take the same photo, but breaking the rule of thirds! Which one looks better?
Leading Lines
Leading lines are SO fun to play with. They’re basically what they sound like; leading lines are lines that lead your eye to the subject of a photo.
This is my favorite photo of mine that uses leading lines:
Your eyes follow the curve of the path right up to Nanea.
My favorite place to take photos is this old abandoned road outside of my neighborhood. A new main road has been built a few hundred feet away from it and it’s a dead end, so I don’t run the risk of being run over. Please do not take pictures in a street that has traffic. But anyway, it’s a fun place to play with leading lines.
Once again, play around with your photos! The best way to learn photography is through experimentation.
Frame Within a Frame
I’m a sucker for this one. Frame within a frame utilizes elements within your scene to create a secondary frame around your subject. It sounds a lot more technical than it is, but once you see examples, it’s very simple! Anything really can be a frame, natural or man-made: tree branches, plants, doorways, mirrors, and even picture frames!
I don’t have many strong examples of frame within a frame in my own photography. As much as I love it, I don’t use it very often. *I do have abundant examples of it in my non-doll related photography, but for this post, I wanted to stick to doll photography.*
I did find this photo in my 2024 dollhouse tour post:

In this photo, the TV is the subject, but you’re looking at it through the dollhouse doorway. The doorway acts as a secondary frame for the TV.
And it’s that simple!
Fill the Frame
With this technique, you fill up all of or most of the photo with your subject. It creates a unique, zoomed-in look!

This photo features almost no white space. It’s a strong example of fill the frame composition.
More Composition Types
There are so, so many more types of composition techniques! I’ve only featured a few in this post, but it can definitely be worth it to look up more “rules” to experiment with!
Brief Notes on Angles
I don’t think there’s a single photographer—no matter how beginner—that doesn’t think about angles when taking pictures. Angles are all about perspective, and of course, they go hand-in-hand with your composition. The right angle can give a unique perspective on your subject—a mentor I once had stressed that photos taken from angles that people wouldn’t normally see your subject at are so much stronger than photos taken from a regular point-of-view. I live by that advice. Dolls are tiny, so if, for example, your doll is standing at the base of a tree, anyone could stand above the doll and look down at it. That doesn’t make for a show-stopping photo. Most people wouldn’t naturally be eye-level with the doll, so that would make for a more interesting photo. The right angle adds emotion, interest, emphasis to your photo.


Here are some photos I found that use different angles!
Now, let’s take another look at this photo:
What if it wasn’t taken from a high angle looking down? Julie probably wouldn’t seem like the main subject. While Joss and Julie are both subjects in the photo, there is more emphasis on Julie. She’s the main character and Joss is the side character, if you will. If I had done things differently, there might not have been as much direction in the photo and the frame might seem cluttered.
In Conclusion
That was… a lot. Wow. And yet, I could probably delve even deeper. If you guys need a part two, seriously, let me know. I will gladly nerd out about photography more. *I Also ultimately plan to turn this into a page on my blog so that it’s easier to refer to.
I don’t know what else to say here, so have a great week and remember to eat your veggies! Bye! <3


Comments
Post a Comment
Comments are always welcome!